A dramatic Halloween yard does not need animatronics, expensive store-bought props, or hundreds of dollars in seasonal decorations. In fact, some of the most convincing outdoor displays are created from materials that already exist around the house. These Top 3 DIY Halloween Front Yard Ideas That Look Expensive but Cost Almost Nothing focus on scale, atmosphere, repetition, lighting, and clever material transformations rather than expensive individual decorations.
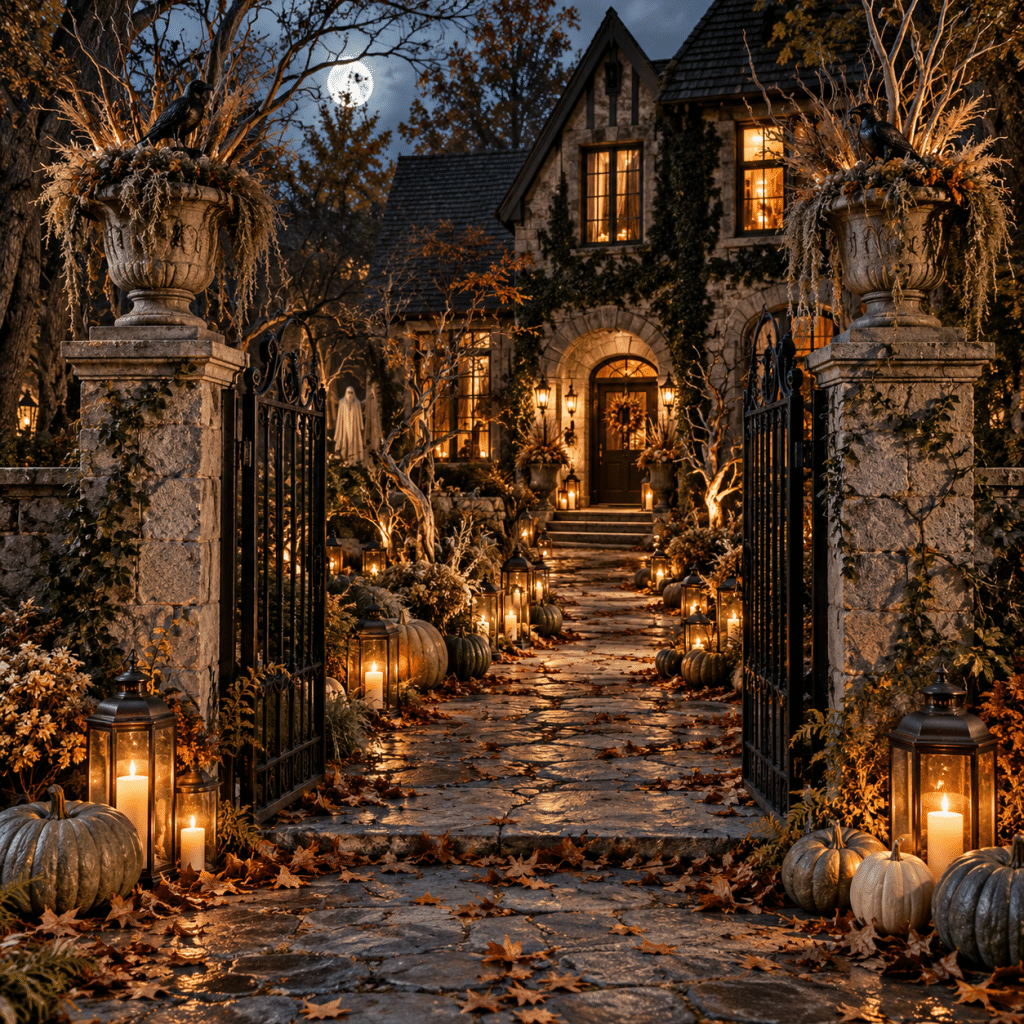
The secret is making the entire front yard feel intentional. One tiny plastic skeleton beside the driveway rarely creates much impact. But a large dark entrance, several repeated lanterns, weathered architectural shapes, and strategically placed branches can completely change how a property looks after sunset. 🎃
Instead of filling every available space with random Halloween decorations, these ideas use a more restrained approach inspired by old estates, forgotten gardens, abandoned cemeteries, and mysterious woodland paths. The result feels sophisticated, cinematic, and surprisingly expensive even when most of the materials come from cardboard boxes, leftover paint, fallen branches, thrift-store finds, recycled containers, and inexpensive lighting.
Even better, many of the basic structures can be stored and reused the following year.
The three ideas below can be used separately, but they become especially impressive when combined into one cohesive front-yard Halloween scene.
Why DIY Halloween Front Yard Ideas That Look Expensive but Cost Almost Nothing Can Be More Impressive
Expensive Halloween decorations do not automatically create an expensive-looking yard.
The opposite can sometimes happen.
A front yard filled with unrelated glowing pumpkins, inflatable ghosts, plastic tombstones, giant spiders, colorful lights, and animated characters can feel visually busy even if the decorations themselves cost hundreds of dollars. The eye has no clear place to focus.
Luxury-looking outdoor styling usually relies on a few basic design principles instead.
The first is scale. Large decorations immediately feel more intentional than dozens of tiny accessories. A seven-foot entrance structure made from recycled cardboard can create more visual impact than twenty small purchased decorations.
The second is repetition. Repeating lanterns, branches, candles, pumpkins, or tombstones creates rhythm across the yard. That rhythm makes the entire display feel planned rather than assembled from unrelated pieces.
The third is a limited color palette. 🖤 Deep black, charcoal, stone gray, aged brown, ivory, muted pumpkin, and warm amber lighting work beautifully together. Keeping the palette controlled makes inexpensive materials feel considerably more refined.
Lighting is equally important.
During daylight, visitors notice materials and construction. At night, however, the eye responds primarily to silhouettes, highlights, shadows, and illuminated pathways. That is why inexpensive props can look extraordinarily convincing after sunset when lighting is placed correctly.
A carefully positioned warm light behind twisted branches may create a more memorable Halloween atmosphere than an expensive animated decoration placed under bright porch lighting.
The Low Budget Luxury Halloween Formula
The easiest way to create an expensive-looking front yard is to think in layers.
Start with one large architectural feature.
Add a secondary group of medium-sized decorations.
Then create smaller repeated details that guide visitors through the scene.
Finally, add low lighting.
This simple formula prevents clutter while helping each decoration feel like part of one larger concept.
| Design Element | Low Cost Material | Expensive Looking Effect | Approximate Cost |
|---|---|---|---|
| Gothic entrance | Cardboard PVC scraps or reclaimed wood | Old estate gateway | $5–$20 |
| Stone urns | Plastic pots buckets or containers | Historic garden decor | $3–$12 each |
| Haunted woodland | Fallen branches and dead garden cuttings | Cinematic forest atmosphere | Free–$10 |
| Lantern pathway | Recycled glass jars | Warm antique lighting | $0–$15 |
| Ghost fabric | Old sheets cheesecloth or drop cloth scraps | Floating aged fabric | $0–$10 |
| Stone texture | Leftover gray beige and black paint | Weathered architectural finish | $5–$15 |
| Dramatic shadows | Solar lights or inexpensive LEDs | Professional nighttime atmosphere | $10–$25 |
The biggest savings come from transforming ordinary objects rather than buying objects that are already marketed as Halloween decorations.
A black nursery pot might cost very little.
A decorative Gothic urn sold specifically for Halloween could cost several times more.
Once the inexpensive pot is painted with a layered limestone finish and filled with twisted branches, most visitors will never notice what it originally was.
That transformation is exactly what makes DIY Halloween decorating so effective.
Important Note: Use battery-operated LED candles or outdoor-rated lighting instead of real flames near cardboard, dry branches, fabric, leaves, mulch, or other combustible decorations.
🥇 Best 1 Build a Grand Haunted Estate Entrance From Cheap Materials
Nothing changes a front yard faster than creating an entrance.
A doorway, arch, gate, or pair of tall pillars immediately introduces architecture into the landscape. Architecture gives the decoration scale, and scale is one of the strongest ways to make a Halloween display look expensive.
The goal is not to construct a permanent structure.
Instead, create the illusion of an old entrance that might belong to a forgotten mansion, abandoned cemetery, or mysterious Victorian estate.
From the sidewalk, visitors should see a tall dark silhouette framing the entrance to the property.
Up close, the surface should appear weathered, layered, and aged.
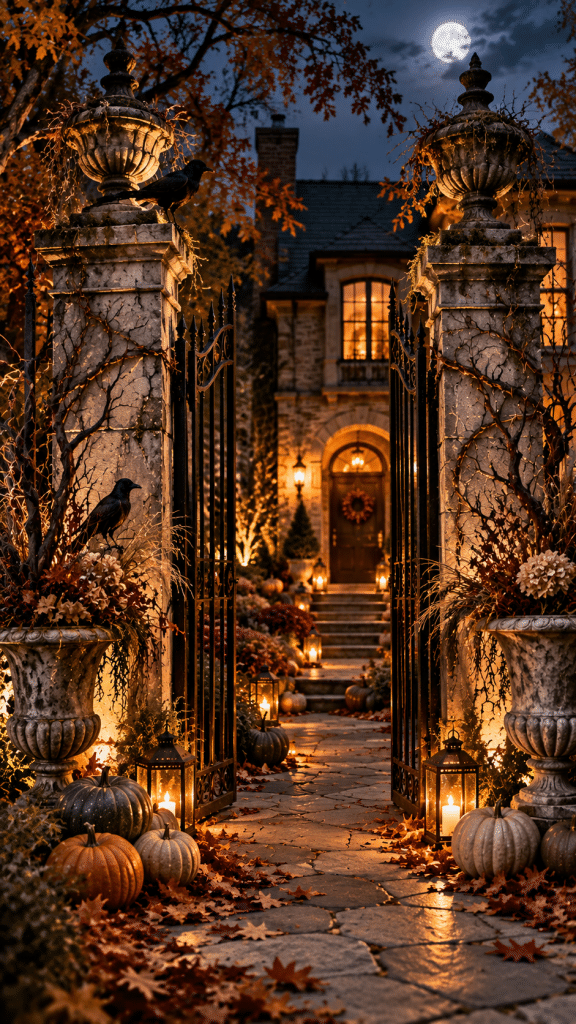
Create Two Oversized Faux Stone Pillars
The easiest version begins with two tall rectangular pillars.
Large cardboard appliance boxes work extremely well. Smaller cardboard boxes can also be stacked and taped together until the desired height is reached.
Aim for approximately five to seven feet depending on the size of the front yard.
The pillars do not need to be perfectly symmetrical.
Small differences can actually make them look older and more authentic.
Cover the cardboard with leftover exterior paint, inexpensive craft paint, or a combination of black, charcoal, gray, beige, and muddy brown.
Start with a dark base coat.
Then apply lighter gray irregularly using a sponge, crumpled paper, or old rag.
Finish with small patches of beige or muted green to imitate mineral deposits, moss, and aging stone.
🪨 The trick is avoiding a perfectly even finish.
Real stone develops discoloration, dirt, cracks, shadows, and uneven surfaces over time. The more irregular the paint texture appears, the less the material resembles cardboard.
Thin black lines can also be painted across the structure to imitate cracks.
If leftover foam packaging is available, break it into rough pieces and attach several fragments near the base. Once painted, they can resemble damaged stone.
Add Cheap Architectural Details
A plain rectangular column can still look somewhat temporary.
Architectural details change everything.
Add cardboard squares around the top and bottom to create layered molding. Even simple strips of cardboard can imitate stone trim when painted consistently.
Small plastic garden pots can be placed upside down on top of each pillar and painted the same stone color.
Suddenly, a stack of cardboard becomes something resembling an old estate entrance.
For additional Gothic character, cut pointed decorative shapes from cardboard and attach them near the top.
Keep the silhouette bold rather than overly detailed because the structure will primarily be viewed from a distance.
Create a Faux Iron Gate
Between the pillars, create the illusion of a wrought-iron gate.
Thin PVC pipe, wooden garden stakes, inexpensive bamboo sticks, or even tightly rolled cardboard tubes can become vertical gate bars.
Paint everything matte black.
Arrange the pieces vertically with taller points toward the center.
Add horizontal supports across the back.
For Gothic-looking spear tips, cut simple triangular shapes from cardboard and attach them to the top of each vertical piece.
From several feet away, these lightweight materials can convincingly resemble black iron.
🦇 A few small decorative bats attached asymmetrically can introduce Halloween character without making the structure feel childish.
The gate does not necessarily need to function.
One side can remain permanently open, creating a dramatic entrance toward the walkway.
Make It Look Older Than It Really Is
Fresh black paint often looks too new.
Age the gate by dry brushing tiny amounts of rusty brown, dark gray, and muted copper around edges and connection points.
Do not cover the entire surface.
Concentrate the color around corners and places where metal would naturally oxidize.
Similarly, the stone columns should receive darker shading near the bottom where dirt and moisture would naturally accumulate.
Adding a little diluted dark paint beneath cracks creates realistic depth.
This weathering process takes very little material but produces a surprisingly convincing transformation.
Add Dead Branches Instead of Expensive Floral Arrangements
Large decorative urns filled with autumn flowers can be beautiful, but they can also become expensive.
Halloween gives you a cheaper alternative.
Use fallen branches.
Look for interesting twisting shapes rather than perfectly straight sticks. Bare branches with several smaller side branches create the strongest silhouettes.
Place a bundle inside inexpensive nursery pots positioned beside the entrance.
Paint the pots to resemble aged stone, or place them inside recycled buckets covered with textured paint.
The branches can remain natural brown, charcoal, or black.
For additional drama, attach a few pieces of torn black fabric deep inside the arrangement.
The fabric should not cover the branches.
It should disappear between them and become visible only when it catches the breeze.
Use One Dramatic Light Source
Lighting can completely change the entrance after sunset.
Instead of wrapping everything in string lights, position one warm spotlight behind each branch arrangement.
Point the light upward.
The branches will cast enormous distorted shadows across the columns, porch, or exterior walls.
This creates far more visual drama than evenly illuminating the entire structure.
🔥 Warm amber light produces an old candlelit atmosphere.
Cool white light produces a colder haunted-estate appearance.
For the most refined result, choose one lighting temperature and use it consistently throughout the yard.
🥈 Best 2 Create Giant Weathered Stone Urns and Pedestals From Recycled Containers
Oversized garden urns instantly make outdoor spaces feel more formal.
They are also expensive.
Fortunately, Halloween decorations are seen primarily from several feet away, which makes faux finishes incredibly effective.
Plastic nursery pots, buckets, inexpensive planters, discarded containers, cardboard cylinders, and even stacked storage tubs can become surprisingly convincing stone features.
The key is building vertical height.
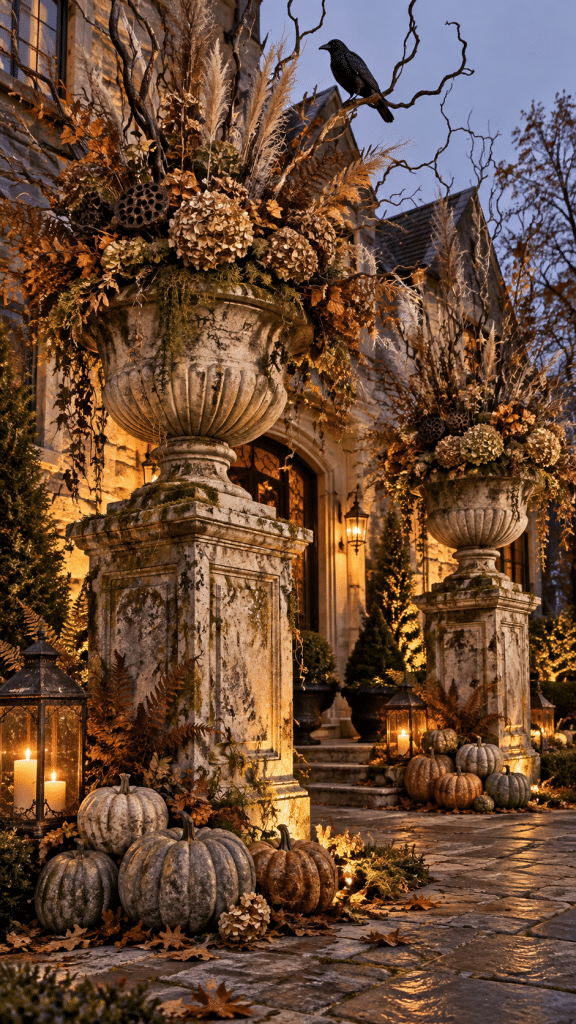
Build the Pedestal First
A large urn sitting directly on grass may disappear visually.
Place it on a pedestal and the decoration suddenly feels architectural.
A sturdy cardboard box can become the base.
If multiple boxes are available, stack two together to create additional height.
Wrap the boxes with paper, cardboard, or thin fabric if necessary to hide printed logos.
Then paint everything with the same faux stone technique used for the entrance pillars.
Start dark.
Add mid-gray.
Dry brush lighter gray.
Finish with small touches of beige, brown, or muted green.
The layering is what creates depth.
Do not worry about producing a perfectly smooth surface. Slight wrinkles, dents, rough edges, and imperfect corners can actually help the piece resemble old damaged stone.
Transform Plastic Pots Into Antique Urns
Basic plastic planters are ideal because they are lightweight and easy to move.
Turn one pot upside down to create a base.
Place another larger pot upright on top.
If the shapes work together, the combination immediately begins resembling a decorative urn.
Secure the pieces appropriately for outdoor use and paint them as one object.
🏺 Matte finishes are generally more convincing than glossy paint.
Stone does not normally reflect light like plastic.
A final uneven dry-brushed layer can help hide the original plastic surface.
For a centuries-old look, dab tiny patches of muted moss green around the lower edges and decorative crevices.
Keep the moss subtle.
Too much bright green makes the effect appear painted rather than naturally aged.
Fill the Urns With Dramatic Free Materials
Once the containers are finished, avoid filling them with expensive artificial Halloween flowers.
Use what nature already provides.
Bare branches are ideal.
So are dried grasses, ornamental grass seed heads, grapevine, fallen twigs, dried hydrangeas, dried seed pods, old vines, pinecones, and weathered garden cuttings.
The arrangement should feel tall and slightly wild.
Begin with three to five large branches that establish the overall structure.
Then add thinner branches around them.
Place dried grasses near the base to soften the transition between the container and larger branches.
🍂 If the yard has natural autumn leaves, a few can be tucked into the arrangement.
The goal is not perfect symmetry.
A slightly windswept arrangement feels more believable.
Add Black Birds Very Sparingly
Inexpensive artificial crows or ravens can be surprisingly effective when used carefully.
One bird perched near the top of a branch arrangement creates character.
Ten birds often make the display feel like a novelty-store decoration.
For an expensive appearance, restraint matters.
Use one bird on one urn and perhaps another somewhere farther across the yard.
This repetition helps visually connect the areas without making the bird theme overpowering.
Create Faux Stone Pumpkins
Plastic pumpkins are common Halloween decorations, but they can look dramatically different after painting.
Instead of bright orange, paint several pumpkins using limestone, charcoal, taupe, concrete gray, or muted ivory.
Apply darker paint around the grooves.
Then lightly dry brush a paler tone across the raised surfaces.
This gives the pumpkins depth.
Arrange them around the base of the urn rather than spreading them randomly across the entire lawn.
Grouping objects makes them feel more deliberate.
Try clusters of three or five pumpkins in slightly different sizes.
Odd-number groupings generally look more natural.
Mixing one traditional muted orange pumpkin among several stone-colored pumpkins can add warmth without destroying the sophisticated palette.
Add Tattered Fabric Without Making It Look Cheap
Fabric is inexpensive, but it can quickly make a Halloween scene look theatrical.
Use it strategically.
Instead of covering the entire urn in fake cobwebs, tie one narrow piece of faded fabric loosely around a branch.
Allow it to hang unevenly.
Cheesecloth, old cotton sheets, damaged curtains, or leftover drop cloth material can work.
Dye the fabric using diluted black, brown, or gray paint if necessary.
The finished fabric should resemble something that has been exposed to weather rather than something freshly purchased.
🕸️ A few thin loose threads are enough to suggest decay.
Position the Urns Like Real Landscape Features
Placement matters almost as much as construction.
Use urns to frame something.
They can sit on opposite sides of the front steps.
They can frame the faux estate entrance.
They can mark the beginning of a walkway.
Or one can be placed beside a large tree with another positioned closer to the porch.
When objects are positioned intentionally along natural sight lines, the yard begins feeling designed.
That is exactly the effect high-end seasonal decorators use.
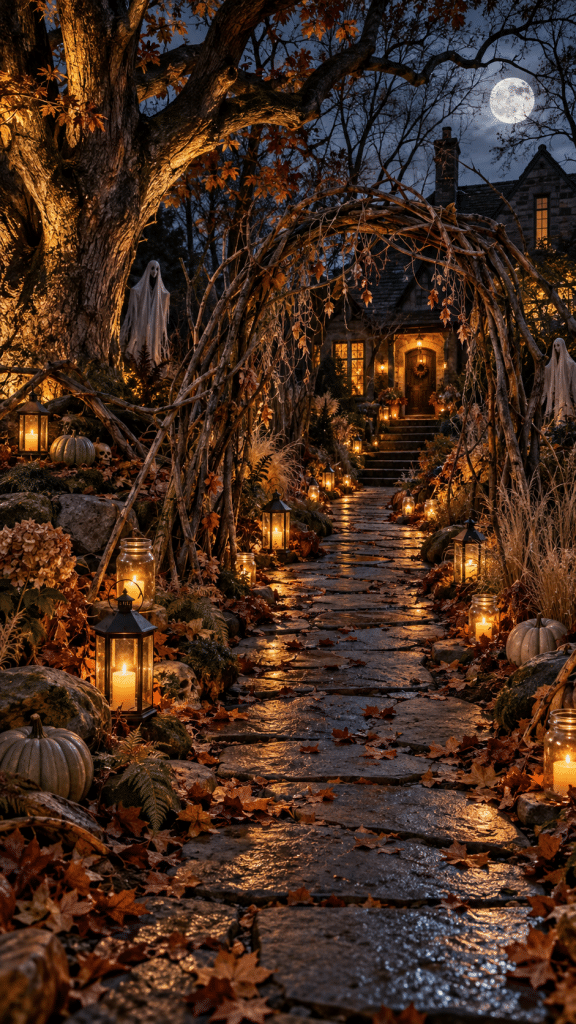
🥉 Best 3 Turn the Front Walkway Into a Moonlit Haunted Woodland Path
The third idea is less about individual decorations and more about atmosphere.
A haunted woodland walkway can be created almost entirely from fallen branches, leaves, recycled jars, fabric scraps, old garden containers, and inexpensive lights.
This concept works particularly well because it transforms the journey from the sidewalk to the front door.
Instead of seeing Halloween decorations from a distance, guests move through the display.
🌙 That sense of immersion makes even simple materials feel impressive.
Start With a Dark Natural Border
Collect fallen branches or trimmed garden branches.
Choose different heights.
Insert them into heavy pots, buckets filled with sand, or other stable containers positioned beside the walkway.
Place the tallest branches near key areas rather than lining everything evenly.
A perfect row looks artificial.
A woodland edge should feel irregular.
Add dry ornamental grasses, dead leaves, vines, and small sticks around the bases.
This hides containers and creates the impression that the branches are emerging naturally from the landscape.
Existing shrubs can become part of the design as well.
Rather than covering them with decorations, illuminate them from below and allow their natural silhouettes to become spooky.
Create Recycled Jar Lanterns
Glass jars are one of the cheapest ways to introduce repeated lighting.
Clean old food jars and remove labels.
Place battery-operated tea lights inside.
For an aged appearance, lightly mist the outside with diluted paint or use translucent brown, amber, or gray coloring sparingly.
Do not make every jar identical.
Some can remain transparent.
Others can appear smoky.
Place the lanterns at irregular intervals beside the path.
The repeated warm lights will naturally guide visitors toward the house.
✨ Repetition is what makes this simple material look intentional.
A single recycled jar looks like a recycled jar.
Fifteen softly glowing jars arranged along a walkway look like an installation.
Add Tall Ghostly Figures Made From Fabric
Instead of using printed plastic ghosts, create abstract figures.
Place tall garden stakes or branches vertically in the ground.
Attach lightweight pale gray, dirty ivory, or faded beige fabric near the top.
Allow the fabric to fall naturally.
Do not add cartoon faces.
Do not make them symmetrical.
The objective is creating tall ambiguous silhouettes that become slightly unsettling when seen from a distance.
Position them deeper inside garden beds rather than directly beside the walkway.
👻 Half-hidden shapes are more mysterious than clearly visible decorations.
At night, position a small ground light several feet away so the fabric catches just enough illumination to become visible.
The figure should seem to emerge from darkness rather than glow brightly.
Create a Giant Branch Arch
If several long flexible branches are available, create a loose arch across a walkway.
Insert branches securely on both sides.
Lean them inward until they almost meet overhead.
Additional smaller branches can be attached across the top.
The structure does not need to form a perfect circle.
In fact, an irregular shape feels much more appropriate for Halloween.
Add a few hanging vines or thin strands of dark fabric.
Avoid covering the structure completely.
Negative space is important because the branch silhouette itself is the decoration.
When illuminated from behind, the arch creates a dramatic frame around anyone walking toward the house.
Build Tiny Woodland Scenes Around Existing Trees
Large mature trees are essentially free Halloween props.
Use them.
At the base of one tree, create a small cluster containing a stone-painted pumpkin, old lantern, several branches, leaves, and perhaps one inexpensive skull partially hidden beneath the foliage.
The decoration should look discovered rather than displayed.
That distinction makes a huge difference.
Instead of placing a skull directly in the middle of the lawn, tuck it behind grasses so only part of it is visible.
Instead of placing a lantern on a clean table, position it beside exposed roots.
Instead of arranging leaves perfectly, scatter them naturally.
Small scenes reward visitors who look closely while the larger entrance structures create impact from the street.
Create Distance With Layered Lighting
Professional-looking outdoor displays almost always use depth.
Avoid illuminating everything from the front.
Instead, create several lighting layers.
Place the brightest light near the main entrance.
Use softer lighting along the walkway.
Place one or two hidden lights deep inside the landscape pointing toward branches or trees.
Some sections should remain intentionally dark.
Darkness gives the illuminated objects more contrast.
💡 If every corner of the yard is equally bright, nothing becomes the focal point.
A sophisticated setup might include warm lanterns beside the walkway, low uplighting beneath a large tree, and a stronger light behind the Gothic entrance.
That is enough.
How to Connect All Three DIY Halloween Front Yard Ideas Into One Expensive Looking Display
The strongest version of this project combines all three ideas.
The Gothic gateway establishes the entrance.
The faux stone urns add architecture and height.
The haunted woodland walkway creates atmosphere and movement.
Together, these elements produce a complete visual story.
Imagine approaching the house from the sidewalk.
The first thing visible is a pair of enormous weathered columns framing a black iron-style gate.
Beside the columns stand tall stone urns filled with crooked branches.
Warm lights from below throw branch shadows onto the entrance.
Beyond the gate, the walkway disappears between irregular silhouettes of bare branches.
Small amber lanterns glow along the ground.
A pale fabric figure stands partially hidden behind a shrub.
Farther back, a large tree is illuminated from below.
The front door remains the brightest destination.
The entire scene might contain only a handful of inexpensive materials, but because everything follows the same visual language, the yard feels cohesive.
That cohesion is what creates the expensive effect.
Keep the Color Palette Controlled
Choose approximately five core colors and repeat them throughout the property.
A strong combination is:
🖤 Matte black
🪨 Charcoal gray
🤎 Weathered brown
🤍 Dirty ivory
🔥 Warm amber
Muted pumpkin orange can be added as an accent.
Bright purple, neon green, electric blue, and multicolor lighting can work beautifully for playful Halloween decorating, but they create a very different style.
For this particular expensive-looking haunted-estate concept, darker natural colors are more effective.
Repeat Materials Across Different Areas
If stone-gray paint appears on the entrance pillars, use the same finish on the urns.
If warm amber lighting appears beside the walkway, use a similar lighting temperature near the porch.
If twisted branches appear inside the urns, repeat them near the woodland path.
These repeated details make separate DIY projects look like parts of one coordinated installation.
Visitors may not consciously notice the repetition, but the overall display will feel balanced.
Let Empty Space Become Part of the Decoration
One of the easiest ways to improve Halloween curb appeal is removing unnecessary decorations.
Empty lawn areas can create dramatic contrast.
A completely dark section of the yard makes a nearby illuminated figure feel more mysterious.
An empty wall makes a giant branch shadow more visible.
A sparse porch makes one enormous urn feel more important.
Luxury styling is often about choosing what not to add.
🎃 Halloween decorating does not require covering every square foot of the property.
Sometimes three powerful focal points are enough.
Cheap Materials Worth Saving for Halloween DIY Projects
Halloween projects become even cheaper when materials are collected throughout the year.
Save sturdy cardboard from large deliveries.
Keep unusual plastic pots.
Store leftover black, gray, beige, and brown paint.
Save glass jars.
Collect old sheets that are no longer suitable for bedding.
Keep sections of natural rope and twine.
Interesting branches can also be saved temporarily if they are dry and safe to store.
Old garden stakes are particularly useful because they can support ghosts, signs, lightweight branches, lanterns, and temporary structures.
Packaging foam can become carved stone.
Broken baskets can become creepy garden containers.
Old curtains can become weathered drapery.
Unused plant pots can become architectural urns.
Even cardboard tubes can become faux iron gate pieces once painted.
♻️ The less recognizable the original object becomes, the more convincing the transformation feels.
How to Make Cheap Halloween Decorations Photograph Beautifully
A visually striking yard is useful not only for trick-or-treat night but also for Halloween photography, social media, and seasonal inspiration.
Photograph the display shortly after sunset.
This period often provides enough ambient light to retain detail while allowing lanterns and uplights to become visible.
Avoid photographing only in complete darkness unless dramatic silhouettes are the goal.
The camera should capture some texture in the faux stone, branches, pumpkins, and pathway.
Stand farther away than expected.
A wide composition showing the entire front yard often looks more impressive than a close-up of individual DIY props.
Then capture several detailed photographs.
Focus on the aged stone texture.
Photograph lanterns glowing beside fallen leaves.
Frame the gate through twisted branches.
Capture a partially hidden ghost figure in the background.
These layered compositions reinforce the illusion that the yard is part of a larger haunted environment.
📸 Slightly lower camera angles can also make inexpensive structures appear taller and more impressive.
Common Mistakes That Make Cheap Halloween Decor Look Cheap
The biggest mistake is using too many unrelated ideas.
A cemetery, carnival, haunted doll collection, pumpkin patch, witch theme, giant spiders, zombies, and glowing aliens might all be fun individually, but combining every concept in one small yard can weaken the overall effect.
Choose one visual story.
For these ideas, that story is an abandoned haunted estate slowly being reclaimed by nature.
Another common mistake is ignoring daytime appearance.
Lighting can hide imperfections at night, but props should still have enough texture and depth to remain convincing during daylight.
Layered paint helps enormously.
So does using natural materials.
Fallen branches, dried grasses, weathered wood, vines, real leaves, and stones automatically introduce textures that are difficult to reproduce with plastic.
Another mistake is making everything perfectly symmetrical.
Formal entrance pillars can be symmetrical, but natural decorative details should not be.
Branches should bend differently.
Pumpkin clusters should vary in size.
Lanterns should not always be spaced at mathematically identical distances.
Fabric should hang irregularly.
Controlled imperfection creates realism.
Final Styling Checklist for an Expensive Looking Halloween Front Yard
Before considering the project finished, walk to the sidewalk and look at the house from the perspective of someone seeing it for the first time.
Identify the first focal point.
Ideally, it should be the large entrance or another major architectural feature.
Then look for a secondary focal point such as a tall urn or dramatic tree.
Finally, check the pathway.
The eye should naturally travel from the street toward the door.
If one small object attracts too much attention because it is brightly colored or heavily illuminated, reduce its visual strength.
If an area feels empty but needs balance, add branches before purchasing more decorations.
If the display feels cluttered, remove something.
If the yard looks flat at night, add one hidden uplight rather than another prop.
The best Halloween displays are often simpler than they initially appear.
The Best Halloween Front Yard Does Not Need the Biggest Budget
Creating a dramatic yard is much more about imagination than spending.
The Top 3 DIY Halloween Front Yard Ideas That Look Expensive but Cost Almost Nothing work because they prioritize large silhouettes, architectural shapes, repeated materials, natural textures, strategic darkness, and carefully positioned lighting.
🥇 A faux haunted estate entrance gives the yard an unforgettable focal point.
🥈 Recycled containers transformed into giant weathered stone urns create the illusion of expensive landscaping.
🥉 A moonlit haunted woodland walkway turns the journey to the front door into an immersive experience.
Most importantly, these projects prove that inexpensive materials do not have to produce inexpensive-looking results.
Cardboard can become stone.
Plastic pots can become antique urns.
Fallen branches can become sculptural arrangements.
Old sheets can become mysterious figures.
Recycled jars can become a glowing lantern pathway.
And a few carefully placed lights can transform everything once the sun disappears.
🎃 Instead of buying dozens of Halloween decorations this year, build three strong visual moments and allow them to tell one story.
The neighbors may assume the yard required an enormous seasonal decorating budget.
Only the person who built it needs to know that most of the materials cost almost nothing.