When you find that your garage door is not closed properly because the seal is broken, what will you do? You can call a professional to come to fix your garage door seal, but it will cost you more. Actually, replacing a garage door seal is easy enough if you know how. Try to replace your own garage door seal before winter by your own.
Read also: THE REASONS WHY GARAGE DOOR WON’T OPEN WITH REMOTE
1. Why Should It Be Changed?
A worn-out garage door seal will damage your door. Your door will touch the ground directly and if you don’t close the door carefully, the door will break in the long run. Not only that but a worn-out garage door seal will not protect your garage from extreme weather and it will damage the things inside the garage. In the end, it will cost you more than the price of the new garage door seal.
2. Buy the New Seal as What Your Garage Door Need
There are various types and models for garage door seal so you can buy the one which matches your old garage seal. However, you may also consider other types which are stronger and more durable so you can save more money in the future. You also need to consider your budget in buying the new seal.

Image source: Youtube.com
3. Bring the Door to A Nice Height
You need to bring the door to a nice and comfortable height so you can do the work without struggling too much. Also, make sure that the door holds up securely so it will not suddenly drop or open while the changing process.
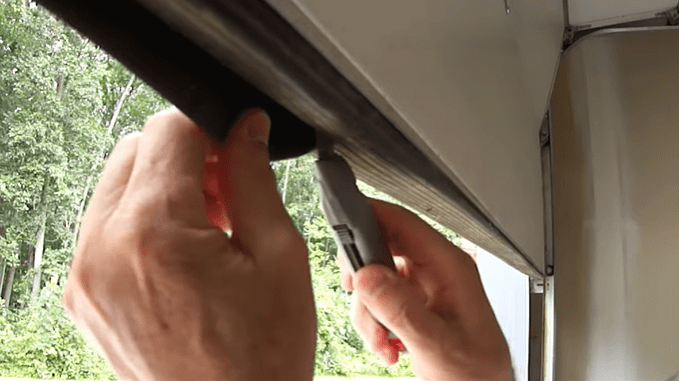
4. Unscrew the Screw on the Seal Area
If your garage door seal is already worn-out you may spot these two screws which hold the seal in place. You need to unscrew both screws so later you can remove the seal easily. If you cannot spot the screws, then you can try to look two inches from the end of the garage door and you can find them.

5. Raise the Door Until the Curved Part
When you are ready to remove the seal, you may notice that the seal is positioned in two tracks and there is a thing that blocks the seal to come out from the track. What you need to do is raising the door until the curve part of the frame so the blocking thing will not block the seal anymore.
6. There is Another Way Out!
If you, somehow cannot pull your seal off the track by using the previous step, there is another way you can try. Use a utility knife and create an opening in the middle of the old seal. You won’t need the seal anymore, by the way, so you can really divide the seal into two parts and remove it easily.
7. Retighten the Screws in The Bottom of Your Garage Door
When you raise the door, you can see several screws under the bottom plate of your garage door. You need to retighten all of the screws and then you all good to proceed to the next step.
8. Make Sure the Track Clean and Tidy
You need to make sure the track clean so the new seal can smoothly fit in and the residual dirt will not damage your new seal. You can clean the tracks by scrubbing them with soap and water. You may also tidy your tracks up if there are crooked parts.
9. Measure the Seal and Cut the Excessive Parts
One thing that you need to make sure of is measuring the new seal as long as you need. You can do this measurement by using the old seal, but you may want to measure your garage door to make sure of the measurement. If your new seal is longer than you need then you can cut it out.

10. Put Your Seal into Water with Dish Soap In
To make it easier for you, you can dip your new seal into the water with dish soap in. This way, you can slide the seal into the track easily.
11. Put the Seal on the Track
You need to position your garage door to make an opening for the new seal so it can enter the tracks. Put the door in a position the same as you remove the old seal, then you can put the new one.
12. Make Sure that You put the right Side In
You may find this easy, but sometimes people put the wrong side in. Make sure that the outside side has some kind of ribs on it. These ribs should touch the ground when you close the door later.
13. Get Some Help
In sliding the new seal, it will be a lot easier if you ask for help. Ask a person to hold the seal in one hand and you can slide the new seal easily. If there is no one to help you then you may need to do this slower.
14. Install the Screws Back
Remember the screws from the first step, now you can install them back. These screws will hold your seal in position so it will not slide to other sides easily.
15. Test the Door
After finishing the replacement, you need to test the door. Try to close it gently and see whether there is a gap or not. If there is any gap between the seal and the floor, you may proceed to the next step.
16. Get the Bottom Seal and Start Marking
There is a seal product but instead of installing it under the garage door, you need to place it under the garage door. This way is easier, cheaper, and faster to fix the gap between your door and the floor. What you need to do is place the seal right under your garage door and then close the door. Then mark the position so you will know the right position.
17. Glue It and Paste It on Your Floor
It is easy to install this seal. You just need to put some glue on it and paste it on your floor; on the mark that you made before. Then let it dry for a bit and you can close the door.


