Your garage renovation project starts with purchasing the door. The next step is preparing the garage door framing. How to frame a garage door? It should be big enough to accommodate the door that you just bought. There are several steps to complete this task and you need to follow them carefully. Even from the supply preparation, you need a precise calculation. Otherwise, the installation would be a big mess and your garage door might not fit.
Read also: CLASSIC FARMHOUSE GARAGE DOOR IDEAS
1. COLLECT YOUR SUPPLIES
First of all, you need to think about the measuring process. To do that, you will need a tape measure. Bring along a pencil to write down the measuring result. Next, purchase the lumber for the garage frame. The suitable size is 2×6 inches. You also need a circular saw or band saw to cut the lumber. Usually the shop won’t help you to cut the lumber into pieces.
Calculate the total amount of lumbers needed for the project. You should understand that each post will require double lumber installation. Aside from the frame, note that the jambs are important as well. Which material is the most suitable for the jamb: wood or PVC? How thick it should be? It will control the opening width and height of the garage door.
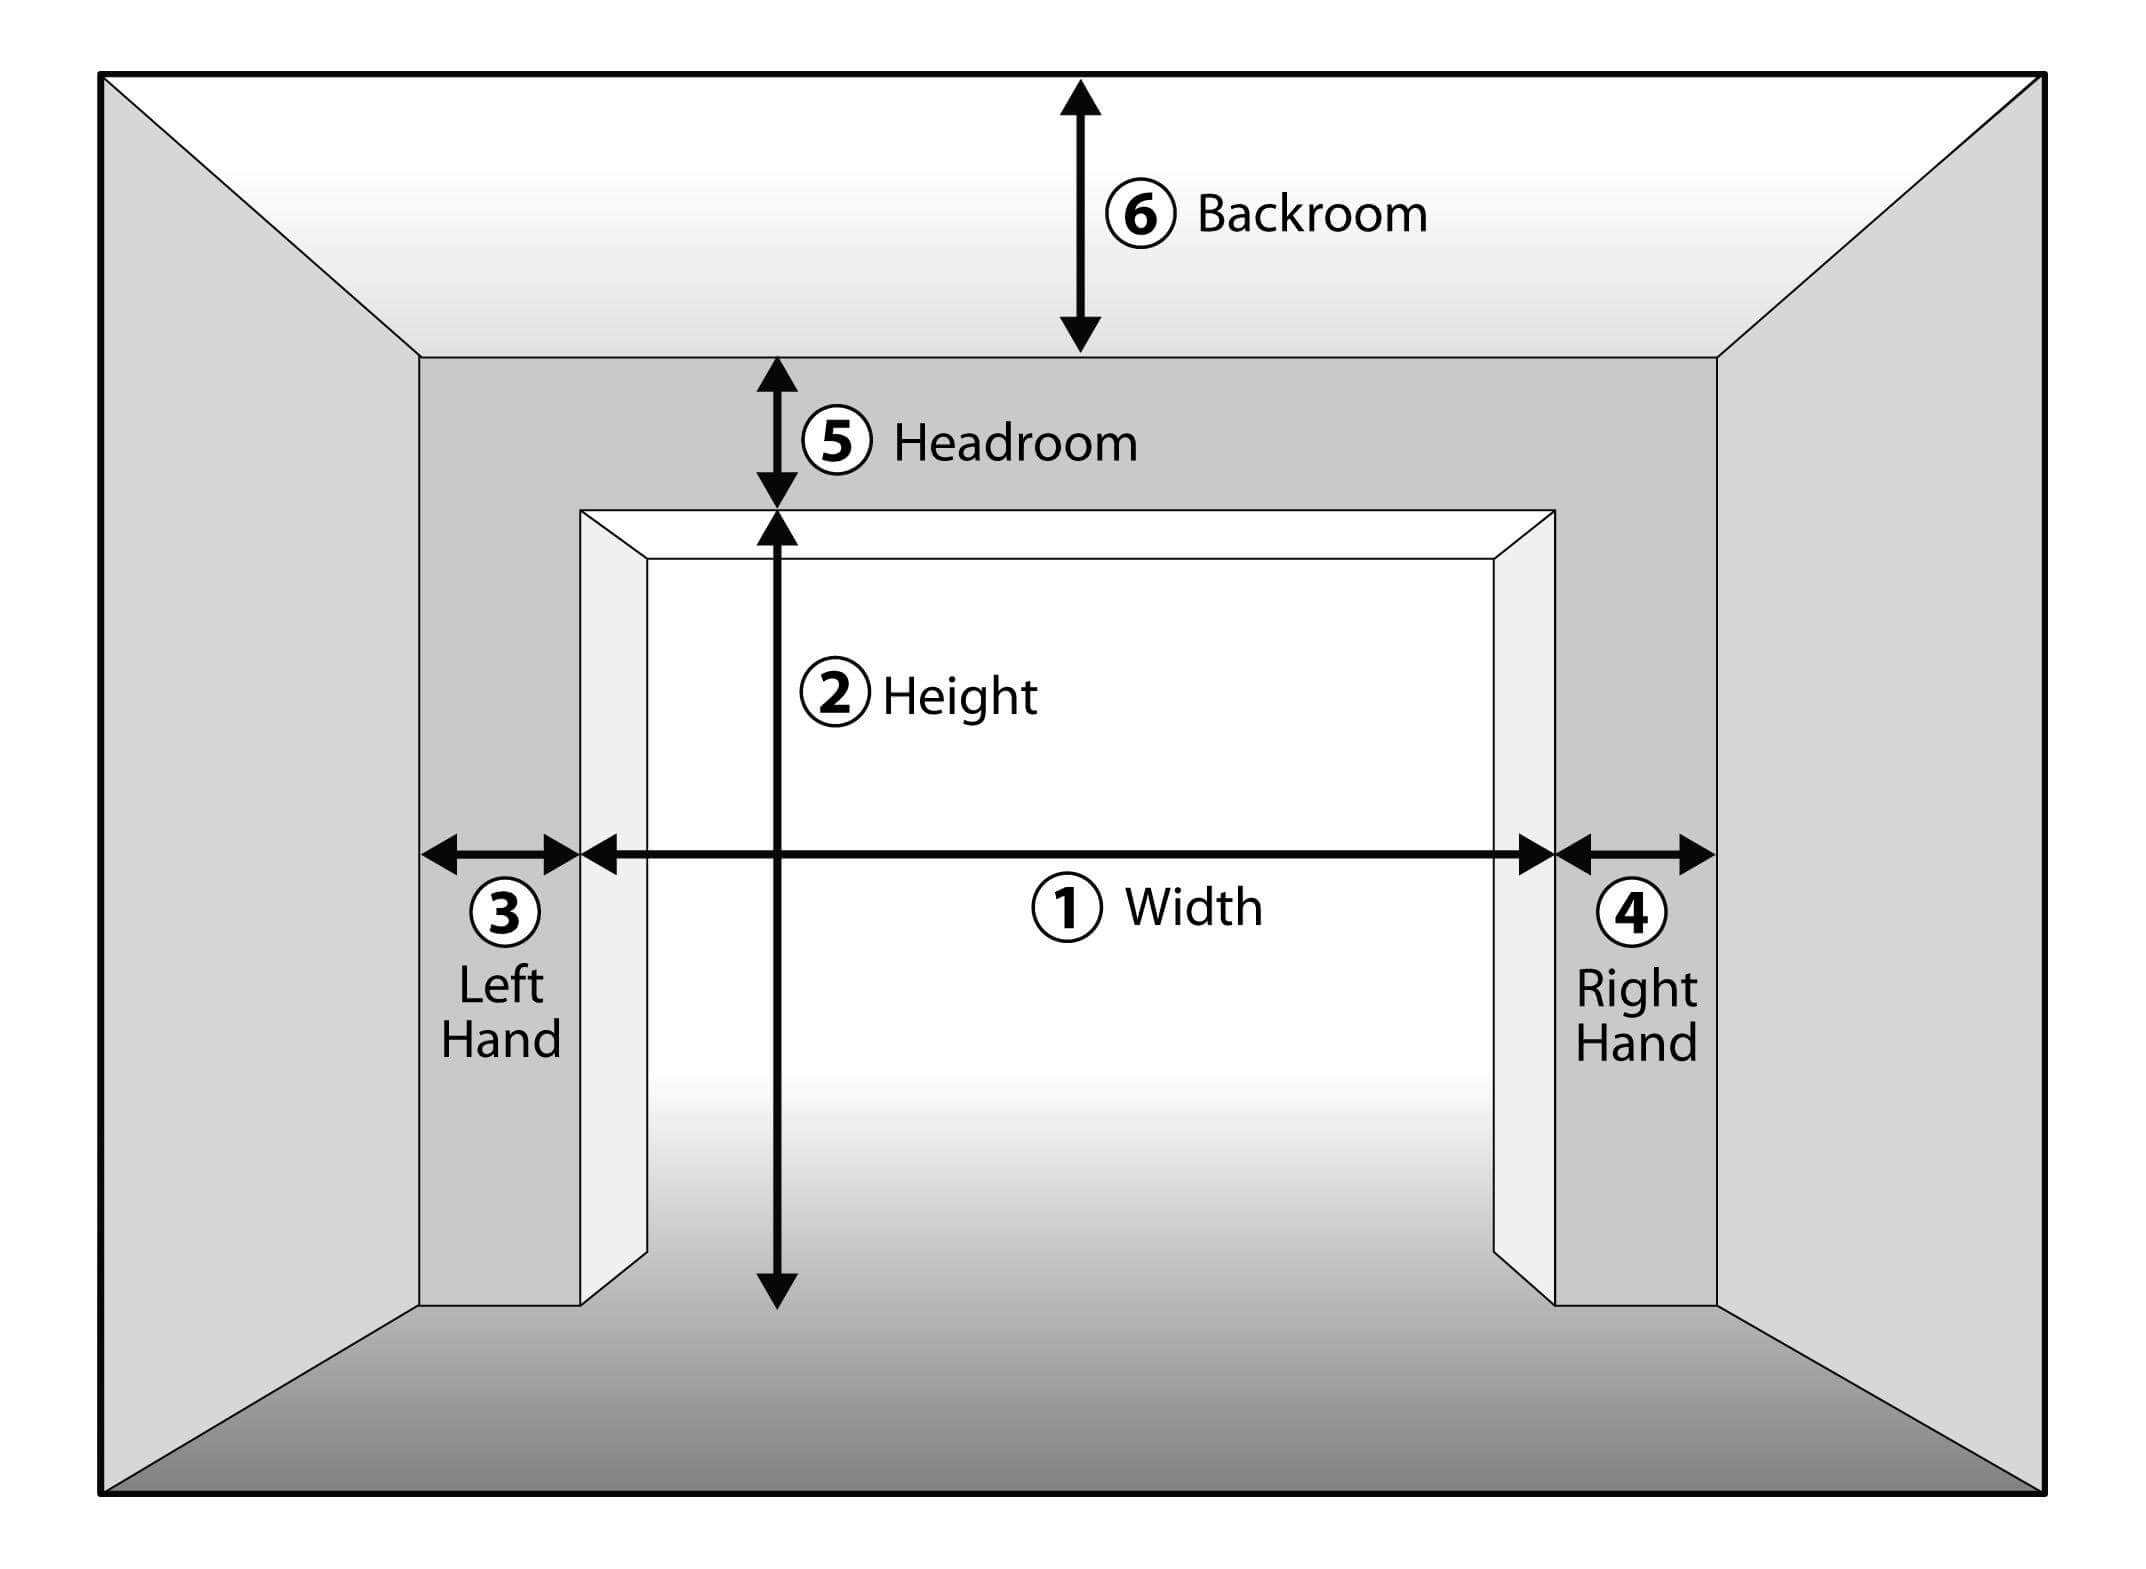
2. CALCULATE THE ROUGH OPENING
What is a rough opening? This is the measurement before the lumber and the garage door installed. Thus, you must have wider and higher rough opening than the garage door itself. The thumbs up rule for rough opening is adding one and half inches to the garage door size. For a 15 inches wide garage door, you need 18 inches wide opening. The same rule applies to the door height as well.
For example, the height of the door is six foot. You need to create a six foot and one-half inches measured from the floor. Since the extra measurement is not too wide, you need to double check it. One option is dry fitting the garage door to the rough opening. If the door still fits perfectly, then you need to add another one and half inches to the measurement.

3. ATTACH THE HEAD JAMB
Have you heard of head jambs? You might have seen it but cannot recall the name. Door jambs are the installation on both sides of the garage door and also on top of the door. Each of them has different name: the ones on the left and right sides are called the side jabs. The one on top of the door is head jamb. This is the first part to install. Only then, the side jambs could be placed properly.
Switching the routine might wreck the whole jambs installation. The header must fit to the top opening, nine inches longer than the garage door width. Lock the position using the framing nails. Remember: there should be no empty space between the rough opening and the top of garage door. In some cases, the head jambs is placed closely to the upper garage wall.

4. NOTE THE HEIGHT FROM FLOOR TO CEILING
The next step is calculating the height from the floor to ceiling. It will help to prepare the space for the goal post. There are two identical items that will be attached to the wall. These items could be compared to track, keeping the space ready for installation. Your measurement from floor to the ceiling should have one and half inches extra. Otherwise, the garage door won’t fit.
It is time to measure the lumbers, cutting them according to your measurement. Do a dry fit test and compare the length to the bottom plate of the wall. There should be a small gap between the floor and the lumber. Then, continue to next process: nail both sides of the lumber to the rough opening. This setting must act as a stud, supporting the rough opening rather than installed in flat position.
5. INSTALL THE GOAL POST
Bring over the goal post. Soon, they will be installed to the rough opening. Remember the head jamb that has been installed previously? The goal posts stay under the head jamb. They should be sturdy enough to stand on their own while supporting the head jamb. If it shakes, the garage door might fall without warning. Framing nails might be used to attach the goal post to the inner part of the rough opening.
One mistake for DIY beginner is forgetting the importance of level measurement. Even though it looks like a small detail, you certainly cannot skip the process. Tilted door could be saved with another total renovation. Repeating the process is equal to admitting your carelessness. Each time you install a part, don’t forget to check the level. It is worth the effort and time.
6. ATTACH THE SIDE JAMBS
Have you decided on the jamb’s materials? You could pick the PVC or wood. Install your chosen side jambs to their place. You know that the installation fits perfectly when the top part of the jamb fits perfectly under the head jamb. There will be no hanging space between the head and side jambs. Take the framing nails to attach the jambs.
A little trick for strong garage door installation: use double jambs to support the entire weight. On each side, put two jambs. Arrange it neatly so the width and length still fit to the rough opening. If it is too thick, the door cannot be installed.
7. FINAL: INSTALL CENTER BRACKET
The center bracket cannot be missed in a garage. Later on, it will be used as the post for the springs and torque of garage door opener. If there is no center bracket, the opener cannot be installed. The length of center bracket is measured from the head jambs to the ceiling. Cut the lumber according to this height. Next, attach the lumber to the center position of the door.
The center bracket is paired to center pad. This piece is installed to the center of the header. Make sure to attach the center pad well. Together with center bracket, they will be a great help for garage door opener installation.


