Starting a diy worm compost bin is one of the smartest ways to reduce kitchen waste, create nutrient-rich compost, and grow healthier plants without needing a huge backyard. Instead of tossing fruit peels, coffee grounds, and veggie scraps into the trash, you can let hardworking compost worms transform them into rich organic fertilizer often called black gold. 🌱
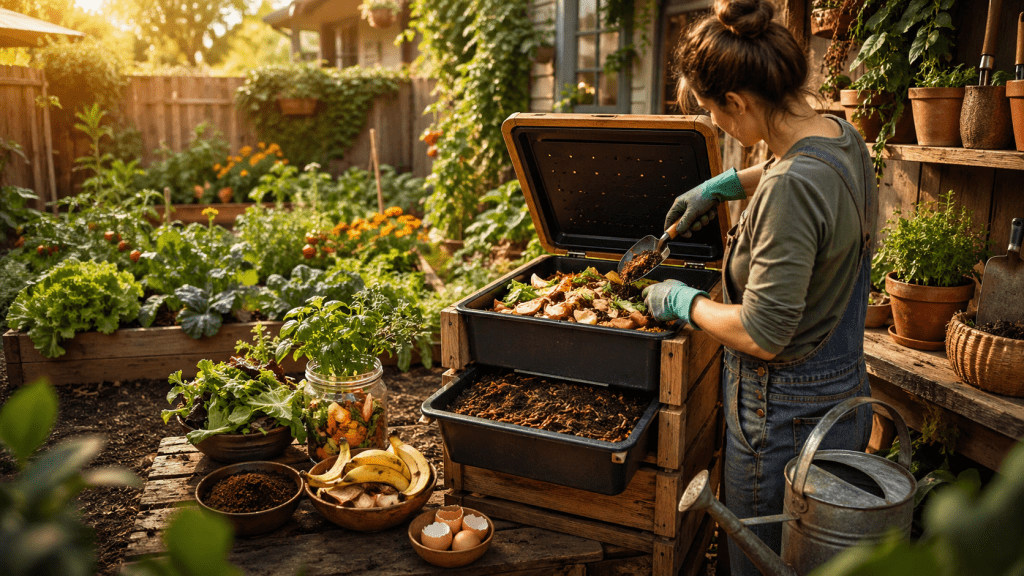
The best part? A diy worm compost bin can fit in apartments, balconies, garages, patios, or small gardens. It is low-cost, beginner-friendly, and surprisingly easy once the setup is right. Whether you want a simple bucket system, a stackable tote design, or a stylish wooden worm farm, there is an option for every budget and space.
This guide explores the Best 3 diy worm compost bin ideas, plus setup steps, feeding tips, troubleshooting advice, and secrets to getting odor-free results.
Why a DIY Worm Compost Bin Is Worth It
Many people think composting needs a large outdoor pile, lots of space, and hard work. Vermicomposting changes that completely. Worms do most of the labor while you recycle food scraps quietly and efficiently.
A worm compost system uses composting worms like red wigglers to break down organic matter. Their castings become one of the most valuable soil amendments available. It improves soil structure, adds beneficial microbes, and boosts plant growth naturally.
Here are some reasons people love this method:
- ♻️ Reduces household food waste
- 🌿 Creates premium fertilizer for plants
- 🏡 Works in small homes and apartments
- 💰 Saves money on store-bought compost
- 👃 Can be odor-free when managed properly
- 🪴 Great for vegetables, herbs, flowers, and houseplants
If you want eco-friendly habits without complicated routines, this system is a winner.
Best 3 DIY Worm Compost Bin Ideas for Every Home
Not every person has the same space, budget, or style preference. That is why choosing the right bin matters. Below are three practical options.
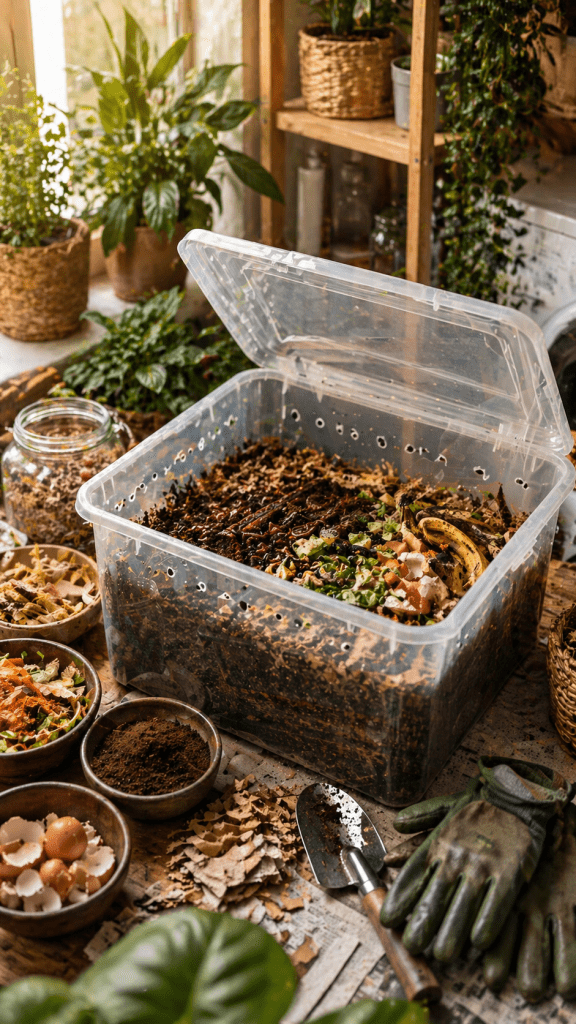
1 Simple Plastic Tote DIY Worm Compost Bin for Beginners
If you are brand new to composting, start here. A plastic tote bin is cheap, easy to build, and perfect for learning the basics.
You only need a storage tote with lid, drill, bedding material, and worms. Drill ventilation holes near the top and drainage holes in the bottom. Add moist shredded cardboard or newspaper, then introduce worms.
This design works well indoors in laundry rooms, garages, under sinks, or balconies with shade.
Why This DIY Worm Compost Bin Works
The plastic tote retains moisture well, which worms love. It is lightweight and easy to move if needed. You can also find bins in many sizes depending on how much kitchen waste your household creates.
Beginners appreciate that mistakes are easy to fix. If it gets too wet, add cardboard. If it gets dry, lightly mist it.
Best For
- Small households
- Apartment living
- Low budgets
- First-time composters
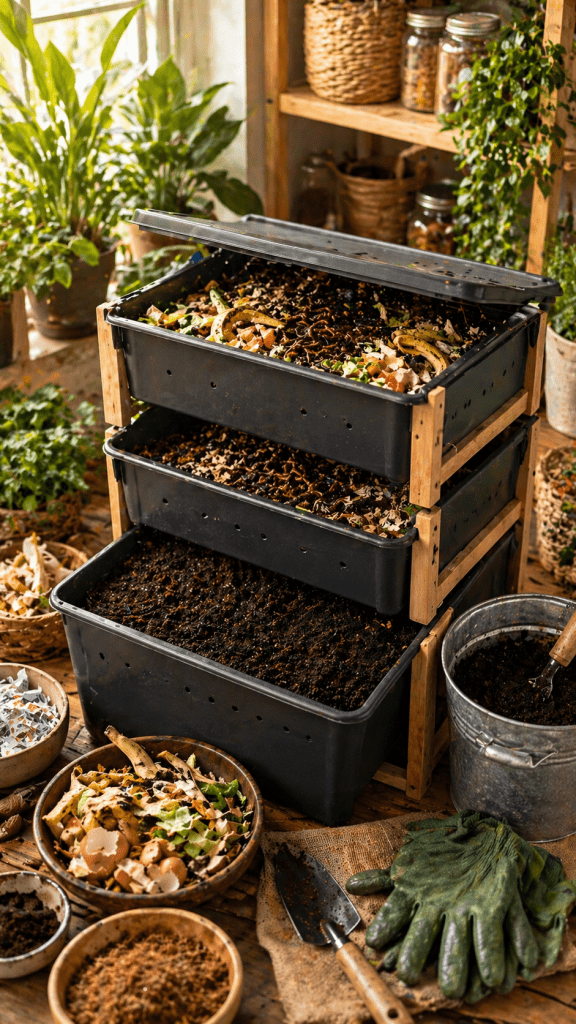
2 Stackable DIY Worm Compost Bin for Faster Harvesting
A stackable system uses two or more trays or bins. Worms naturally move upward toward fresh food, leaving finished compost below.
This means harvesting castings becomes much easier. Instead of digging through one large messy bin, you simply remove the finished lower tray.
Many gardeners love this design because it saves time and stays cleaner.
Why a Stackable DIY Worm Compost Bin Is Smart
As the bottom layer matures, add food to the top tray. Worms migrate upward through holes. The lower tray becomes mostly finished castings.
This system is especially useful for people who generate regular food scraps and want ongoing compost production.
Best For
- Busy gardeners
- Medium households
- Frequent compost harvesters
- Cleaner maintenance lovers
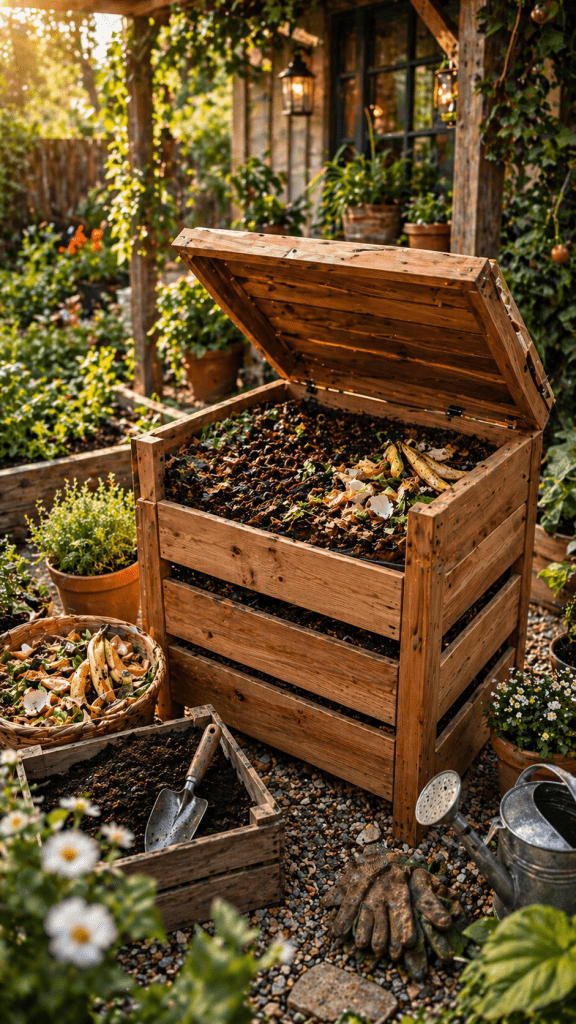
3 Wooden DIY Worm Compost Bin for Backyard Style
Want something more attractive than plastic tubs? A wooden worm bin looks natural and blends beautifully into outdoor spaces.
Use untreated wood like cedar or pine. Build a box with ventilation gaps and a lid. Raise it slightly off the ground for airflow and drainage.
This option is perfect for patios, sheds, and gardens.
Why a Wooden DIY Worm Compost Bin Looks Premium
Wood insulates well against temperature changes and creates a rustic garden aesthetic. It can also be customized in size and appearance.
Many homeowners prefer wooden bins because they look intentional rather than like storage containers full of worms.
Best For
- Backyard gardens
- DIY lovers
- Stylish outdoor spaces
- Larger worm colonies
Quick Comparison Table for DIY Worm Compost Bin Types
| Bin Type | Cost | Difficulty | Best Space | Harvest Ease | Looks |
|---|---|---|---|---|---|
| Plastic Tote | Low | Easy | Indoor small spaces | Medium | Basic |
| Stackable System | Medium | Medium | Indoor or covered outdoor | High | Neat |
| Wooden Bin | Medium to High | Medium | Garden or patio | Medium | Excellent |
What Worms to Use in a DIY Worm Compost Bin
Not all worms compost efficiently. Garden earthworms are not ideal for bins. Use composting species instead.
Best Worm Choices
- 🪱 Red Wigglers (Eisenia fetida) – top choice
- 🪱 European Nightcrawlers – larger and hardy
- 🪱 Blue Worms – productive in warm climates
Red wigglers are the most recommended because they reproduce quickly, eat efficiently, and thrive in bins.
For beginners, start with around 250 to 500 grams depending on bin size and food waste amount.
Important Note: Never use regular soil worms dug from the yard. They usually fail inside compost bins because they need different living conditions.
How to Build a DIY Worm Compost Bin Step by Step
Creating a functional worm bin does not require advanced skills. Here is a beginner-friendly process.
Materials Needed
- Bin or container with lid
- Drill or screwdriver for holes
- Shredded cardboard or newspaper
- Coconut coir optional
- Spray bottle with water
- Compost worms
- Food scraps
Step 1 Prepare Ventilation
Drill small air holes around the upper sides and lid. Worms need oxygen, but holes should be small enough to discourage pests.
Step 2 Add Drainage
Drill a few holes in the bottom if needed. Place a tray underneath to catch moisture.
Step 3 Create Bedding
Mix shredded cardboard, paper, and optional coconut coir. Moisten until it feels like a wrung-out sponge.
Step 4 Add Worms
Place worms gently on top of bedding. Leave the lid open under light for a few minutes so they move downward naturally.
Step 5 Feed Lightly
Start with a small amount of chopped kitchen scraps. Overfeeding is a common beginner mistake.
Step 6 Maintain Weekly
Check moisture, fluff bedding lightly, and continue feeding once scraps disappear.
Best Foods for a DIY Worm Compost Bin
Worms enjoy many common kitchen leftovers, but balance matters.
Great Foods to Add
- 🍌 Banana peels
- 🥬 Lettuce and greens
- ☕ Coffee grounds
- 🍎 Apple scraps
- 🥕 Carrot peels
- 🍞 Small bread amounts
- 🥚 Crushed eggshells
Chop scraps smaller for faster decomposition. Freeze and thaw scraps first if you want quicker breakdown.
Foods to Avoid
- 🥩 Meat
- 🧀 Dairy
- 🍟 Oily foods
- 🍋 Large amounts of citrus
- 🌶 Spicy foods
- 🧅 Excess onion and garlic
- 🐟 Fish scraps
These items may smell bad or attract pests.
How Often to Feed a DIY Worm Compost Bin
New worm keepers often overfeed because they want fast results. The smarter move is patience.
Feed small amounts every few days at first. Watch how quickly scraps disappear. Once worms become active and population grows, increase gradually.
A healthy bin should process food steadily without rotting piles.
Signs You Are Feeding Correctly
- Food disappears in a few days
- No foul smell
- Worms active under bedding
- Moist but not soggy environment
Signs of Overfeeding
- Rotten odor
- Fruit flies
- Mushy wet food piles
- Worms trying to escape
When in doubt, feed less.
Where to Keep a DIY Worm Compost Bin
Location affects worm health more than many beginners realize.
Best Spots
- Garage
- Laundry room
- Covered balcony
- Shaded patio
- Under sink with airflow
- Utility room
Ideal Temperature
Worms usually prefer moderate temperatures, roughly 55°F to 77°F (13°C to 25°C).
Extreme heat or freezing cold can stress or kill them.
If your climate is hot, keep the bin shaded and cool. If cold, move indoors or insulate.
How to Keep a DIY Worm Compost Bin Odor Free
A healthy worm bin should smell earthy, like forest soil. Bad smells usually mean imbalance.
Fix Bad Odors Fast
- Add dry cardboard if too wet
- Reduce food scraps temporarily
- Bury food under bedding
- Increase airflow
- Remove spoiled food pockets
Golden Rule
Wetness plus too much food equals stink. Balance moisture and feeding to stay fresh.
How to Harvest Worm Castings
After a few months, bedding transforms into dark crumbly compost.
Method 1 Side Feeding
Push finished material to one side. Add fresh bedding and food to the empty side. Worms migrate, leaving castings behind.
Method 2 Light Separation
Dump contents on a tarp under bright light. Worms move downward away from light. Scrape castings off the top gradually.
Method 3 Tray Harvest
If using stackable bins, simply remove the lower finished tray.
Harvesting becomes easier with practice.
How to Use Worm Compost in the Garden
Worm castings are potent, so a little goes a long way.
Easy Uses
- Mix into potting soil
- Sprinkle around vegetables
- Top-dress houseplants
- Add to seed starting mix
- Blend into flower beds
Simple Ratio Guide
| Use | Suggested Amount |
|---|---|
| Houseplants | 10 to 20 percent of soil mix |
| Vegetable beds | Thin layer around plants |
| Seed starting | 10 percent blend |
| Containers | Handful per pot |
Plants often respond with greener leaves and stronger growth.
Common DIY Worm Compost Bin Problems and Fixes
Worms Escaping
Usually caused by stress: too wet, too dry, overheating, or acidic food overload.
Fix by checking moisture and reducing problem foods.
Fruit Flies
Bury scraps deeper and cover with cardboard or paper.
Bin Too Wet
Add dry shredded cardboard and improve airflow.
Bin Too Dry
Mist lightly with water and add moist bedding.
Slow Composting
Feed smaller pieces, maintain warmth, and ensure enough worms.
DIY Worm Compost Bin for Apartments
Many renters assume composting is impossible. Not true.
A small tote worm bin tucked in a laundry corner or balcony can work beautifully. Use tight lids with air holes, avoid overfeeding, and freeze scraps before feeding if pests are a concern.
Apartment composters often love how quiet and compact the system becomes once established.
Money Saving Benefits of a DIY Worm Compost Bin
This project does more than reduce waste.
You may spend less on:
- Bagged compost
- Chemical fertilizers
- Soil conditioners
- Trash disposal volume
- Store-bought plant boosters
For gardeners, one worm bin can pay for itself surprisingly fast.
Seasonal Tips for Better Results
Summer
Keep cool and shaded. Frozen food scraps help lower temperatures.
Winter
Move indoors or insulate outdoor bins.
Rainy Season
Protect from flooding and excess moisture.
Dry Season
Check bedding moisture more often.
Why Kids Love a DIY Worm Compost Bin
This project can become a fun science lesson.
Children learn about:
- Food waste recycling
- Soil health
- Nature systems
- Responsibility
- Gardening basics
Watching scraps turn into rich compost feels like magic.
Final Thoughts on Starting a DIY Worm Compost Bin
A diy worm compost bin is one of the easiest and most rewarding eco-projects for homes of any size. Whether you choose a cheap plastic tote, efficient stackable trays, or a stylish wooden design, the benefits are huge: less waste, healthier plants, and nutrient-rich compost made right at home. 🌿
If starting today, the smartest move is simple: choose the easiest setup, begin small, feed lightly, and let the worms do the hard work. In a few months, kitchen scraps become premium garden gold.
Sometimes the best garden upgrade is not expensive tools or fancy fertilizer. Sometimes it is just a box full of hardworking worms. 🪱


